Showing posts with label custom alterations. Show all posts

Tuesday, February 14, 2012

Tuesday Tips...Turning a fabric tube right side out

Have you ever sewn a strap or tie right sides together with one end closed and then had a hard time turning it right side out? Here is an easy way to do it. All you need for this is a large crochet hook or knitting needle! 

First, flip over the opened end of the tie/ strap and then place the tool that you are using, (in this case I am using a crochet hook) in between the flipped fabric and the non-flipped fabric. 


While gently pushing up on the tool, pull down on the flipped fabric. 

When you are finished, if you are using a tool with a pointed end you can lightly poke the corners to make them nice and square. 

If neither side of the strap/ tie is sewn shut than you can simply attach a safety pin to one side and flip it inside the strap. 

Then push the safety pin towards the opposite end of the strap. (This is similar to putting elastic through a waistband.) 

When you get to the end take out the safety pin and you are done. Voila!

Thursday, February 9, 2012

Spring Easter Dresses...

Spring is around the corner, and it’s bringing many new things. For Easter, we have a cheerful and sweet selection of dresses for little girls. If you find a pattern or other dress that you would like to copy, we can make it for you to a perfect fit and with your personal touches. Here are a few Easter dresses that we have made.

We love old fashioned Shirley Temple style dresses...these Easter dresses are classic, and will make every girl love to twirl round and round!


Tuesday, February 7, 2012

Tuesday Tips...Understitching Your Lining

One very useful tip for sewing is to under-stitch when sewing a garment with lining. Under-stitching is used to hold down your lining so that it does not show and also to make the seam less bulky. This technique is often used on necklines. After connecting the lining to the main fabric, iron the seam and then turn the seam allowance so that it lies under the lining piece.


Next, sew the lining to the seam allowance an 1/8 inch away from your seam. Make sure that you only sew the lining and the seam allowance together, not the main fabric. (I used white thread so you could see it easily but a matching thread would be best)

When you are finished sewing press your lining.


When this is done you will have a beautiful neckline with no lining showing on the outside.

Monday, October 10, 2011

A recycled shirt...into a pillow

Do you have any shirts that you've had for a while, but you don't want to throw them away? Or a shirt you might be grown out of that has some sort of design or unique embellishment? Well don't throw it away, because today we are going to show you how to turn rags to riches. 


First off, measure your shirt across the shoulder area. With a straight edge draw a square using the dimension you just measured. Then cut the square out one layer at a time. This way you make sure that you are using the best part of the shirt. 


 Once you have both your squares cut, sew them with right sides together, leaving an opening on the bottom of the pillow to put a form in. 
Fill the pillow, and hand sew the opening.


As you see on our pillow, a button up shirt is perfect to use the buttons in the front, they make great added detail!

Thursday, September 29, 2011

Autumn Apparel

We've had this little autumn outfit in our shop for some time now but finally got the opportunity to take photos of Annie Rose in it because she over visiting Eloise today! It was a gorgeous fall day with the crisp, cold morning air and then the sun broke through this afternoon creating a enjoyably warm day.
Annie liked it so much she wanted to keep it!

Our "Apple Dumpling" outfit


 This is a dress we just made for Eloise. My mom bought it from us to give her on her birthday. It's a little big yet but she'll grow into it fast!

Thursday, September 15, 2011

A Stylish Upgrade...

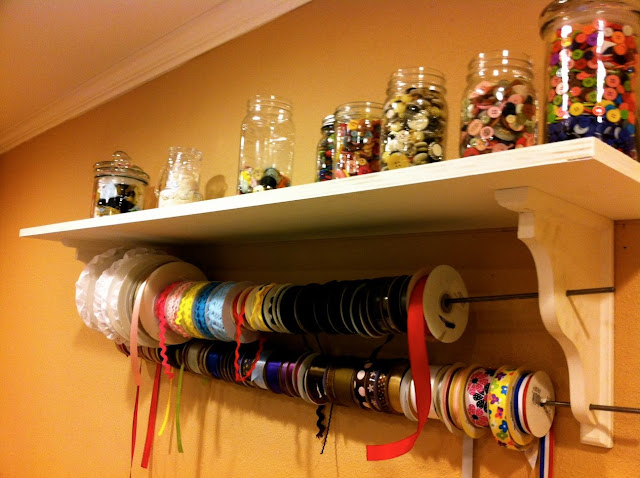
A few weeks ago, we were trying to figure out a good way to display our ribbons and lace, but also make them easily accessible. After looking at many pictures online of ideas, we finally decided on the design. Off we went with our brother to Home Depot.

We got 2 wall mounts, a piece of smooth plywood for the top, some dowels, and a nice trim for the edge of the shelf to finish it off.

It's so easy even you can do it! Just paint everything, measure and put it up! I love how it turned out, and all the colors of ribbon draw you to it.
Painting


On a side note...Here is something we just finished for a customer, it is for a first birthday. I think it's a cute idea for any little boys first birthday!
The front of the onesie...

The back of the onesie...

Sunday, May 15, 2011

You're Invited!!! June 2nd & 3rd

Come join us for our grand opening of our newly renovated sewing studio and boutique shop. See where we create our unique children’s clothing, home decor items and custom formal and casual apparel. Enjoy our other local sellers handmade jewelry, greeting cards, baby gifts and more. See a variety of our students projects that they created to see the possibilities you could create! Bring a friend and both will receive 20% off your entire purchase!

Let all your friends know about it! We want to make this the biggest turn-out in our company's history!

Thursday, April 21, 2011

Custom Wedding Dress Alterations

We at Bella Jean specialize in custom alterations. In this case, we had a customer come to us needing their wedding dress made 2 sizes smaller, as well as hemmed and a bustle added. During this process we had fittings to ensure exact size. We also took pictures of the wedding dress before we did anything so we could have them for references along the way. For the bustle we looked at a few other wedding dresses for ideas on how to put it up.

The customer also wanted her mothers veil customized for herself. Because her dress had lace, as well as her mothers veil, we just replace the original lace with lace from her dress. In the end the customer was very pleased and we enjoyed sewing this for her!


Wednesday, April 20, 2011

Uniqueness in the details...Summer Dress

A few weeks ago we sewed Eloise a summer dress that she could wear in Maui. We wanted this dress to be unique and stand out. So we took into consideration every little detail we could think of. For the straps we shirred them...that is putting elastic thread in the bobbin and sewing straight lines. We also used this technique for the back bodice. This technique made it easy to get on and off and she can wear it for a longer amount of time. Using a coordinating material for a bottom band, also adds a great element. We then looked at all our trims and decided ric rac would look splendid! We applied it to the bodice waist seam and the bottom band seam. Buttons also add a great little element... So we applied them on top of the ric rac. Lastly we added little bows where the straps met the bodice...

Every little detail added so much to this dress! So next time you go to make something, think about what you can add that will make it unique and stand out!


Monday, March 21, 2011

Making a Perfect Fit with Custom Clothing Alterations

One of the foremost parts of our business is alterations. Recently we have been altering a wedding dress. First we take pictures of every detail needing altered so we can have a reference to continually go back to. This is one of the most important things I've learned in performing alterations. Please feel free to email me for more tips on the best process for altering clothing.


 We do hemming for all styles of pants.

We can replace zippers in coats, vests, dresses, cushions and more. Replacing zippers is very enjoyable for me.
Thank you, Veronica

Monday, February 14, 2011

Spring and Summer Fun...photo shoot...

Last week we got all of our spring and summer dresses finished and did a photo shoot. I love the designs (if I do say so myself) Well, please enjoy...and remember, if you want any of these dresses, we can make them in any custom size!

Our little models did such a great job! Kaylee and Daisy played very well together and had such an enjoyable time!