Showing posts with label decor. Show all posts

Monday, January 12, 2015

Christmas dinner...Great decor ideas for any formal meal

On Christmas, my older sister and I decided we wanted to make a nice dinner for our entire family. 
I love to decorate and do crafts, and my sister loves to cook and bake... So together we make a great team. I got to teach her how to craft and she got to help me in the kitchen with my cooking and baking skills. 
For our theme we decided to go with the rustic winter decor, as I had in the rest of the house. Of course we turned to Pinterest. We found a great name tag idea.. For practically free! Cut some sticks...hot glue and print the names out. One problem we ran into with this simple project was that the sticks were wet, so the hot glue wouldn't keep them together... So we popped them on a cookie sheet and baked them in the oven for a few minutes to dry them out! Walla! We had dry sticks. 


We then cut a lot of branches of fir trees and expanded our table decor down the length of the table. We also cut logs and set candles on them. 


For the silverware and napkins I rolled the napkins, wrapped twine a few times around it...and tucked a cinnamon stick and green twig behind the twine. 

For our food and appetizer table, my friend had just cut down a tree and I saw in the back of her truck a wedge about 6" thick, some used that to add height and dimension. I then added candles, and burlap and wine, cheese, appetizers, and water. 


Tuesday, May 31, 2011

A Productive Memorial Day...

Since it was a holiday yesterday and we had lots to do before our open house this Thursday, we decided it was upgrade day for Bella Jean Boutique...My brothers Chris and Isaac did more of our trim and crown molding in our new area. It's amazing how nice you can make something look with crown molding!
Crown molding!


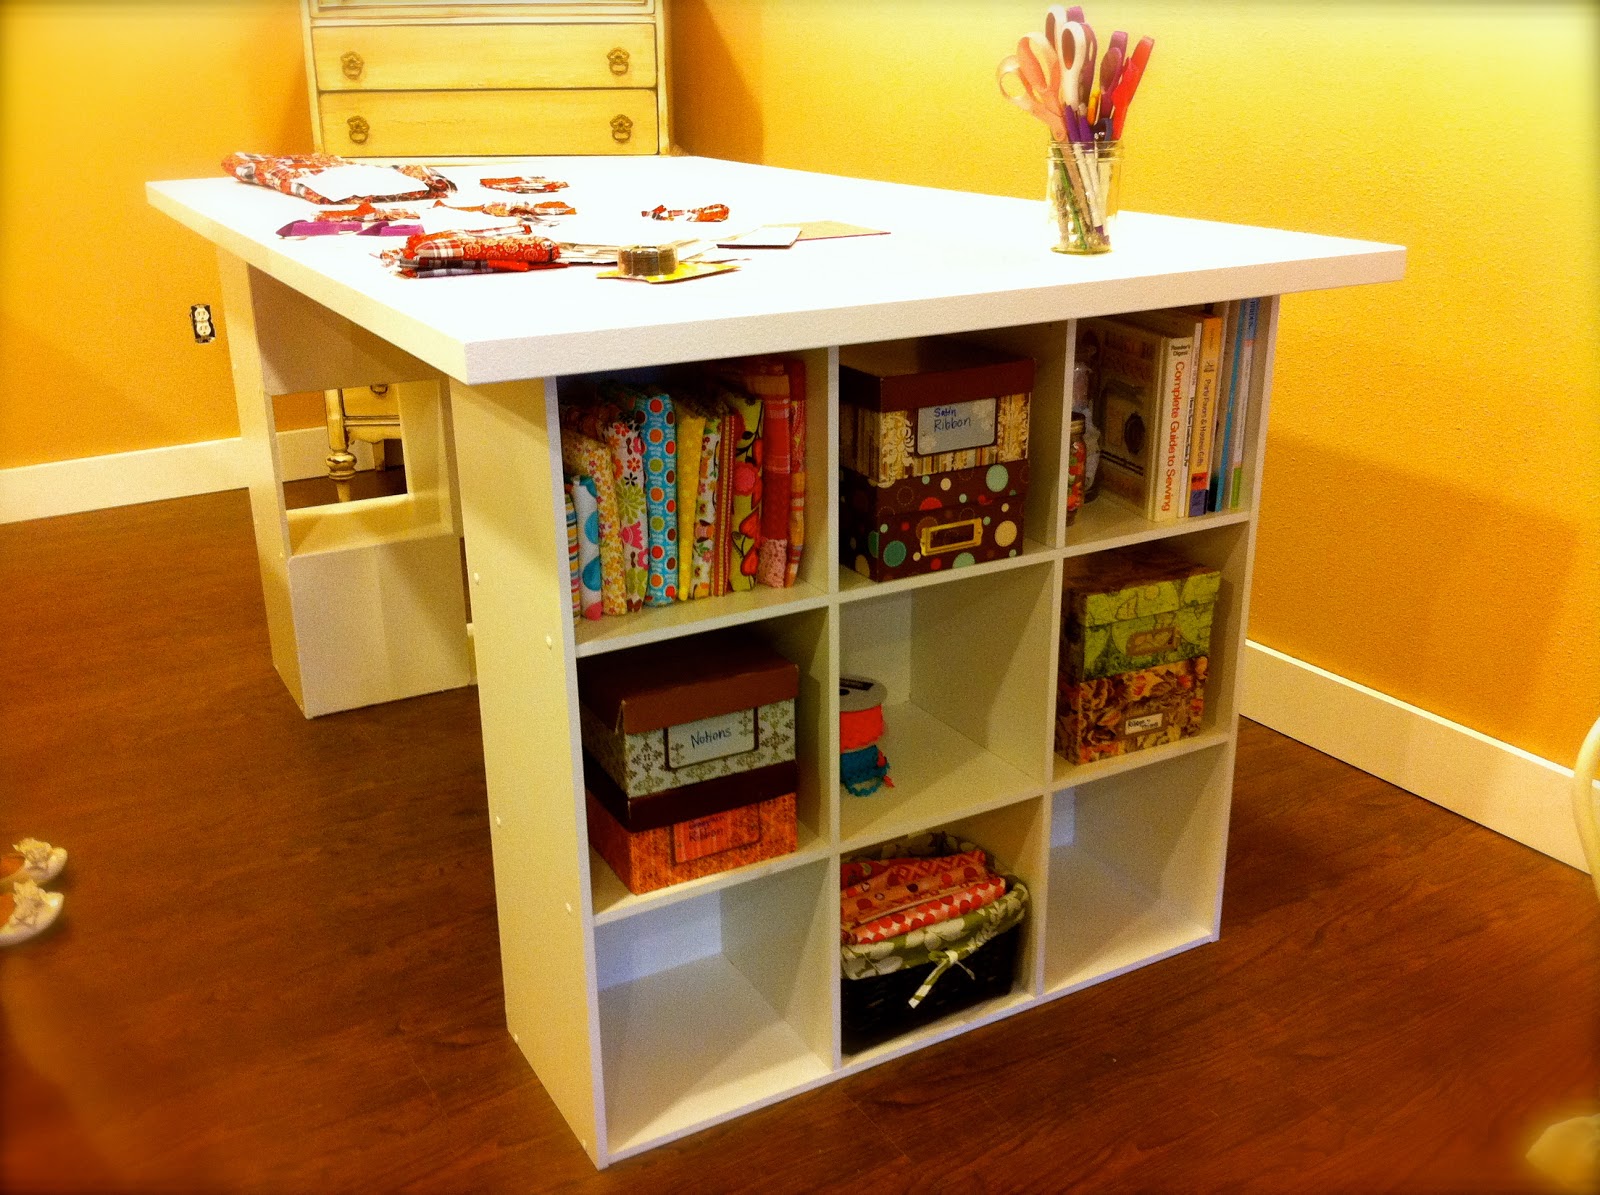
My dad and I took a trip to our local fabric store and got material for our fitting room curtain, as well as material for a project my dad wanted to do. (I don't think I could have gotten him to go with any other reason). We then headed off to Home Depot to get the materials for a new cutting table in our work area. I was so excited! Our old one had been around a little too long!
Materials for Cutting table


We found a picture of a cutting table we liked and copied it, with our own dimensions. If you want to make one, it actually is pretty easy! All you do is buy 2 cube organizers in the color of your choice. Then we got a melamine board for the table top...we made ours 3.5' x 6'...then we got a trim for around the edge to make the top look thicker.


We assembled the 2 cube organizers first, adding some wood glue in all the dowled areas to make it stronger.


We then placed them in the area we wanted them and set the melamine on the top. We centered it, marked it in case it shifted and began drilling holes up through the cubes into the top. Veronica went behind me and screwed all the screws in (of course using screws that were short enough to not go through the top).


Chris then put the painted trim all the way around in his professional contractor way. My dad painted the backs of the cubes white, as well as touched up the trim! We were done! A couple hour project and there you have a beautiful cutting table and much more needed storage space!


So don't forget to come check out our new area and improvements on Thursday and Friday June 2nd and 3rd from 10am-5pm...

Monday, May 23, 2011

Creativity in Your Decor

Lately we've been searching the internet for new and interesting ways to add to our decor that doesn't cost alot but makes a big difference and a lasting impression on our customers. One small decoration i found is rolled paper flowers. They are really simple but they dress up a small area. Here's where I found it. This website is full of amazing decor ideas and tutorials for different things you can make.


Another little element we added to our walls was the decorated embroidery hoops. We've had the plain hoops sitting around for a long time and finally decided to look for things we could use them for. There were lots of websites full of different ways you could decorate them. Here's how we did it. We put fabric in them and then found out how to make fabric flowers and added them with other embellishments. The Jones Design Company also has tutorials for these kind of flowers.


Today we got this dresser which, you can obviously see is our favorite style; shabby chic! We put the green shelf on top to create a hutch and there you have it, a great display area. We are using the dresser drawers for much needed storage.

One other website I wanted to share with you is called Pinterest. It is full of pictures and pictures of decor, fashion, gardening ect... that you can add to your board and easily refer back to. You basically just type in anything you want for example "dresser displays" and it comes up with loads of pictures to help you with your decor. I found it really helpful! It also leads you back to the original source (usually blogs) of the pictures so you can usually find out how exactly its done.